NGINX Kubernetes Ingress Controller | Deployment
With the infrastructure in place to support the solution, the NGINX Kubernetes Ingress Controller deployment can begin.
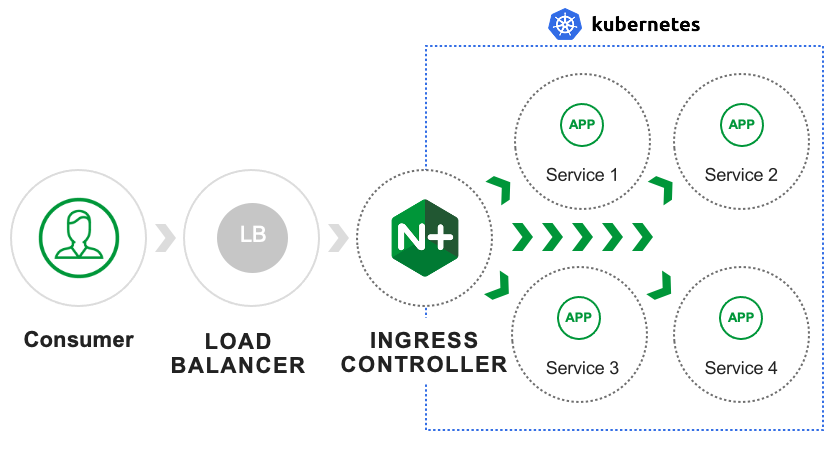
What is NGINX Kubernetes Ingress Controller?
NGINX Ingress Controller provides a robust feature set to secure, strengthen, and scale containerized apps, including:
Advanced app centric configuration - Use role-based access control (RBAC) and self service to set up security guardrails (not gates), so teams can manage their apps securely and with agility. Enable multi tenancy, reusability, simpler configs, and more.
Visibility and performance monitoring - Pinpoint undesirable behaviors and performance bottlenecks to simplify troubleshooting and make fixes faster.
Change the directory into the NGINX Ingress cloned repository.
In the terminal window, copy the below text and paste+enter:
cd ~/Desktop/kubernetes-ingress/
Example:

Copy NGINX repository Certificate and Key
NGNIX Ingress Controller has two offerings, an open-source edition and a purchased supported solution. Both solutions come from NGINX; however, there are features and performance differences between the two offerings. Below are popular features and use cases.

This solution uses the purchased NGINX Ingress Controller. Through an account team, workshop registration, or an instructor, you should have received an NGINX certificate and key to access the NGINX registry. Access to the registry allows for building current NGINX products.
VSCode Coder will allow you to drag files into the interface. Drag the cert and key files to the root of the Kubernetes-ingress folder.
Example:

Verify contents of the certificate and key
In the terminal window, copy the below text and paste+enter:
cat nginx-repo.*
Verify that you have a certificate and key
In the terminal window, copy the below text and paste+enter:
ls nginx-repo.*
Example:

Create the NGINX Ingress Controller Docker image
Warning
NGINX Ingress Controller should NEVER be uploaded into a public registry, this would allow for stealing intellectual property, breaking country software agreements, etc. The license owner would be responsible.
Note
Building the image will take a few minutes (3-5)
Note
Terraform command
terraform outputdisplays environment outputsWithin the Kubernetes-ingress Registry are all the needed files to create our NGINX Ingress Controller Docker image. With the certificate and key in place, we can make our image. After the image is created, our local installation of docker will push our image to the Registry we created with Terraform. When Terraform applied our Registry object, it output the name of our registry. Its output was a prefix and looked like a URL.
Example of Terraform outputs:

Step 1. In the terminal window, replace
RegistryURLwith the output value and copy the below text and paste+enter:make DOCKERFILE=DockerfileForPlus PREFIX=RegistryURL
Example:

After the image is built, docker will publish the image into Registry.
Example:

Verify that the docker image was created
In the terminal window, copy the below text and paste+enter:
docker images
Example:

Modify the NGINX Kubernetes Ingress Controller manifest
Warning
Failure to update the manifest with a valid image:tag location will result in a failed deployment. Change Line
1791Kubernetes deployments are typically maintained through manifest files. The deployment of the NGINX Ingress Controller will be created through manifests. Multiple Kubernetes resources can be made through a single file. This environments to-be-created resources are declared in the
nginx-ingress-install.ymlfile.When executed, Kubernetes will build all the resources. For resources it doesnt know about (the newly created NGINX Ingress Controller container), it will reach out to the created registry and pull down the image we created. If you ever need to update the container, push a new one to the registry, change the tag and rerun the deployment. Declarative nature systems will replace with what has been defined.
Kubernetes resources types created:
Kubernetes namespace
Kubernetes service account
Kubernetes cluster role
Kubernetes clusterrolebinding
Kubernetes secret
Kubernetes configmap
Kubernetes ingressclass
Kubernetes customresourcedefinitions
NGINX Ingress Controller deployment
NGINX Ingress Controller service
Step 1. Modify the manifests file on line
1791for theimage:tagvalueNote
Docker images and tags can be found by running the docker command
docker imagesThe NGINX Ingress Controller resource is in the environment-specific registry. However, the manifest does not know what that resource location is. Update the manifest by replacing the default value with the registryURL and image:tag location of the environment.
For modifying the file, either vi or opening the file in VSCode will produce the same result.
The vi method:
In the terminal window, copy the below text and paste+enter:
sudo vi /home/ubuntu/Desktop/f5-digital-customer-engagement-center/solutions/delivery/application_delivery_controller/nginx/kic/templates/nginx-ingress-install.yml
modify the image:tag
save and exit file with
:wqTo modify with VSCode, navigate to f5-digital-customer-engagement-center > solutions > delivery > application_delivery_controller > nginx > kic > templates > nginx-ingress-install.yml, alter and save
Example:

Deploy the NGINX Kubernetes Ingress Controller
Note
If the NGINX Ingress Controller Pod is not in a running state, verify the image:tag value is correct from deployment manifest
In the terminal window copy the below text and paste+enter:
kubectl apply -f /home/ubuntu/Desktop/f5-digital-customer-engagement-center/solutions/delivery/application_delivery_controller/nginx/kic/templates/nginx-ingress-install.yml
Validate that the NGINX Ingress Controller is running:
kubectl -n nginx-ingress get pods -o wide
Example:

Expose the NGINX Ingress Controller Dashboard
NGINX Ingress Controller (all purchased editions) have an internal dashboard that can be exposed. The Dashboard presents analytic stats of services deployed on NGINX. These same stats can also be exposed for collection systems like Prometheus.
In the terminal window copy the below text and paste+enter:
kubectl apply -f /home/ubuntu/Desktop/f5-digital-customer-engagement-center/solutions/delivery/application_delivery_controller/nginx/kic/templates/nginx-ingress-dashboard.yml
Example:

See the NGINX Ingress Controller services
Warning
The EXTERNAL-IP values will be used during several parts of the lab, in AWS this is an FQDN. It is recommended to copy these to an easily referenceable location like a clipboard/digital notepad
The deployment of NGINX Controller Ingress contains two Kubernetes services: Ingress and the other for Dashboard.
In the terminal window, copy the below text and paste+enter:
kubectl get svc --namespace=nginx-ingress
Example:

Export the NGINX Ingress Controller services
Interacting with the NGINX Ingress Controller is more comfortable with exporting the service External IPs into system variables. This allows for templating to take place when we expose our applications.
In the terminal window copy the below text and paste+enter:
export dashboard_nginx_ingress=$(kubectl get svc dashboard-nginx-ingress --namespace=nginx-ingress | tr -s " " | cut -d' ' -f4 | grep -v "EXTERNAL-IP")
export nginx_ingress=$(kubectl get svc nginx-ingress --namespace=nginx-ingress | tr -s " " | cut -d' ' -f4 | grep -v "EXTERNAL-IP")
Browse to the exposed NGINX Ingress Controller services
Note
The Dashboard and the Ingress websites will take a few minutes to become available (1-3 Minutes)
There is nothing yet deployed on NGINX Ingress Controller. However, the Dashboard and the Ingress are active. When the services were created in Kubernetes, Kubernetes created an AWS ELB. These ELBs allow for access to the services, and if the NGINX services ever scale, they will dynamically be added.
NGINX Dashboard URL (replace with the dashboard-nginx-ingress EXTERNAL-IP):
http://EXTERNAL-IP/dashboard.htmlExample:
NGINX Ingress Controller URL (replace with the nginx-ingress EXTERNAL-IP):
http://EXTERNAL-IP/Example:


The NGINX Ingress Controller services have been created and exposed
At this point, we can deploy our applications, and provide access through NGINX!
Proceed to Arcadia Application | Deployment